Boost AI professional headshot generation with 7 pro tips (2025)
Boost AI professional headshot generation with 7 pro tips (2025)
If you’ve tried an AI professional headshot generator and thought, “Why do I look slightly… off?”, you’re not alone. Blurry skin, weird eyes, random jewelry, and awkward poses are all common when you just upload a few selfies and click generate.
The good news: you can fix most of this with a better process, not a different tool.
This guide shows you 7 practical, pro-level tips to boost the quality of any AI-generated headshot you create—especially with tools like HeadshotVIP. You’ll learn how to choose the right input photos, what to wear, how to pose, how to write useful style prompts, and how to iterate until you get consistent, 4K-ready results for LinkedIn and business profiles.

Why your AI professional headshot doesn’t look “quite right” yet
Most top-ranking pages talk about which AI headshot generator to use. That matters—but it’s only half the story.
From analyzing tools like Canva, Aragon AI, and reviews of 30+ AI headshot apps, a few patterns show up:
- Input photos matter more than the model. Dark, grainy, or extreme-angled selfies confuse identity models.
- Random outfits and backgrounds = random results. If you don’t decide the “persona” first, you get inconsistent images.
- No iteration = wasted credits. One batch, no feedback, no curation almost always leads to “good enough,” not “great.”
HeadshotVIP, Aragon, and similar tools are capable of studio-level, LinkedIn-ready outputs, but they rely on you to give them the right raw material.
The rest of this article is about exactly that: how to feed AI the kind of data and direction that produces sharp, realistic, professional images you’ll actually use.
7 pro tips to boost any AI professional headshot (especially in HeadshotVIP)
These tips are tool-agnostic, but where it helps, you’ll see specific steps for using HeadshotVIP.
Tip 1: Start with “training” photos that look like a real mini photoshoot
AI identity models learn your face from your uploads. If those uploads are chaotic, your results will be too.
Aim for 8–20 training photos that:
- Are sharp and well-lit (no heavy filters or beauty apps)
- Show only you (no group photos, no partner cutouts)
- Include head and shoulders, not just tight face crops
- Have neutral or slight smile (avoid exaggerated expressions)
- Avoid sunglasses, hats covering your forehead, or heavy shadows
In practice, this means:
- Stand near a window with soft daylight.
- Ask a friend (or use a tripod/timer) to take a quick batch:
- 3–5 photos straight on
- 3–5 at slight angles (left/right)
- 2–3 with different shirts/tops
- Keep the background simple—a blank wall is perfect.
Why this matters technically
Tools like HeadshotVIP use facial recognition and identity consistency modeling. When your eyes, jawline, and hair are clearly visible in different but related angles, the model locks onto your features and is less likely to:
- Change your eye color
- Morph your nose or jawline
- Over-smooth your skin into plastic
If you only upload car selfies at night and faded vacation shots, no AI can reliably guess what you actually look like.
Tip 2: Dress for the role you actually want (and keep it simple)
An AI professional headshot is a branding asset, not just a nice picture. Treat wardrobe like a strategic choice.
Choose outfit styles by career type
For corporate / finance / legal:
- Dark blazer (navy, charcoal, black), light shirt
- Minimal patterns, no loud logos
- Tie optional, but if you use one, keep it solid or subtle
For tech / startup / product:
- Smart casual: solid-color shirt, polo, or knit
- Optional blazer over a simple tee
- Avoid busy flannel or giant graphics
For creative / marketing / freelance:
- More color is fine, but stay cohesive
- Interesting textures (denim, knit, soft blazer) instead of loud prints
Safe color palette for AI headshots:
- Navy, charcoal, mid-gray, white, soft blue, muted earth tones
- Avoid neon, micro-patterns (they can turn mushy), or ultra-black-on-black (loses detail).
In HeadshotVIP, you can select styles like “LinkedIn,” “corporate,” “startup,” or “creative”. Pick one that matches your target audience first, then adjust later instead of mixing everything in a single batch.
Tip 3: Master three reliable poses AI handles really well
AI models are trained heavily on common portrait poses. Lean into that instead of experimenting wildly.
Pose 1: Straight-on, confident, LinkedIn classic
- Body: facing mostly forward, shoulders relaxed
- Chin: slightly down (avoids “looking down at the viewer”)
- Expression: soft smile or calm neutral
Use this for:
- LinkedIn profile picture
- Company website “About” page
- Conference speaker bios
Pose 2: ¾ turn, friendly expert
- Turn your body about 30° away from camera
- Head turned back toward camera, slight tilt allowed
- One shoulder slightly closer to the lens
Use this for:
- Personal websites
- Author bios
- Thought-leadership posts
Pose 3: Seated/leaning, relaxed professional
- Lean slightly forward onto a table or armrest
- Hands loosely clasped or one forearm visible
- Works great when paired with a blurred office background
Use this for:
- Founders, coaches, consultants
- “Work with me” pages
In HeadshotVIP
When picking sample styles or reviewing outputs:
- Save and favorite photos that match one of these three poses.
- Use those as reference images for future generations (where supported) to nudge the AI toward consistent posing.
Tip 4: Use “prompt presets” instead of vague style requests
Many AI headshot tools now accept style prompts or presets. Instead of typing “make me look professional,” describe the lighting, background, and mood.
Here are plug-and-play prompts you can adapt in HeadshotVIP or any AI headshot generator that allows custom styles.
For a classic LinkedIn headshot
“Sharp, studio-quality AI professional headshot, neutral gray background, soft diffused lighting, head and shoulders framing, business-casual outfit, natural skin texture, realistic colors, no heavy retouching, suitable for LinkedIn profile photo.”
For startup / tech founder
“AI-generated headshot in a modern office environment, shallow depth of field, natural window light, smart casual outfit (blazer over T‑shirt), warm but professional look, slight smile, realistic skin and hair, 4K resolution for website founder bio.”
For creatives / freelancers
“Professional AI virtual headshot with soft colored background gradient, natural daylight, minimal shadows, creative but polished look, simple outfit, subtle expression, export-ready for portfolio website and social media.”
Prompt tips that help almost every model:
- Specify background type:
- “neutral gray background”
- “blurred office background”
- “soft blue gradient background”
- Specify realism level:
- “natural skin texture, not over-smoothed”
- “photorealistic, not cartoon or 3D”
- Specify usage:
- “suitable for LinkedIn profile”
- “for corporate website headshot”
HeadshotVIP already optimizes styles for business use, but adding realistic constraints (no extreme filters, no cartoon look) keeps outputs closer to professional standards you’d see in LinkedIn’s own profile photo guidelines or modern company sites.
Tip 5: Control lighting and backgrounds like a photographer
You don’t need to know everything about photography, but two things matter a lot in AI headshots:
- Where the “light” seems to be coming from
- How busy or clean the background is
Best lighting setups to ask for
- “Soft, even studio lighting” – safest for corporate
- “Natural window light from the side” – realistic, flattering, modern
- “Subtle bokeh background with soft light” – adds depth, feels premium
Avoid:
- “Dramatic shadows,” “harsh sunlight,” or “backlit only” for LinkedIn and resumes; these are harder for AI to keep flattering and consistent.
Backgrounds that look professional almost everywhere
- Plain light gray
- Slight gradient (blue/gray)
- Blurred office interior
- Soft bookshelf background (not overly busy)
In HeadshotVIP, choose business-focused backgrounds rather than random lifestyle or themed settings. This helps you:
- Keep a consistent brand across LinkedIn, resumes, and portfolio
- Ensure 4K exports still look clean and not noisy or over-detailed behind you
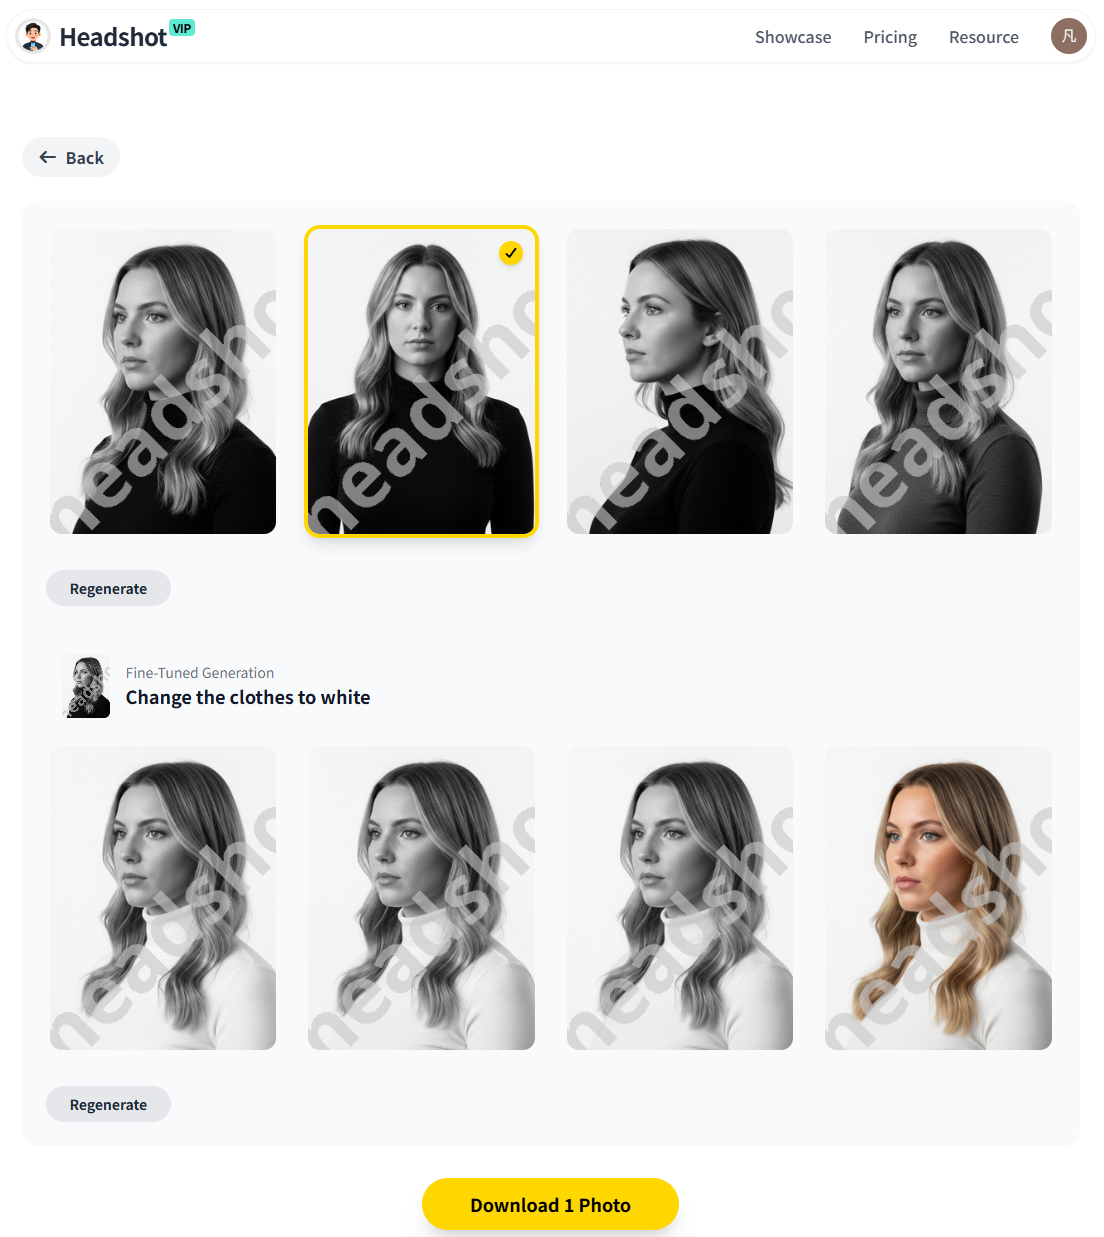
Tip 6: Iterate smartly inside HeadshotVIP (don’t just accept the first batch)
Even great AI models will give you a mix: a few excellent shots, many decent ones, and a handful of “nope.” The trick is to steer the next batch using what worked.
Method 1: HeadshotVIP step-by-step workflow
Use Case: Professionals and job seekers who need a clean, LinkedIn-ready AI professional headshot fast.
Operation Steps:
Go to HeadshotVIP
Visit https://headshot.vip and create or log into your account.Choose your style pack
Select the style closest to your goal:- “LinkedIn / Corporate”
- “Startup / Tech”
- “Executive”
- “Creative / Personal Brand”
Upload your training photos
- Add 8–20 clear selfies or portraits (see Tip 1).
- Mix a few outfits and angles, but keep lighting consistent if possible.
- Avoid filters, sunglasses, and group crops.
Set key preferences
- Choose preferred outfit type (e.g., blazer, shirt, business casual).
- Pick background direction (neutral, office, modern gradient).
- Where supported, add simple style notes like:
- “natural skin texture”
- “light makeup” / “no makeup”
- “subtle smile”
Generate your first batch
- Start the generation and wait for your AI professional headshots to be processed.
- HeadshotVIP’s engine optimizes lighting, background, and sharpness for LinkedIn and business use.
Curate and mark favorites
- Scroll through the results and favorite 5–10 images that:
- Look most like you
- Have flattering angles
- Match your target brand (corporate, startup, creative)
- Download a few immediately for backup.
- Scroll through the results and favorite 5–10 images that:
Use favorites to refine a second batch
- Use your best images as reference (where available in HeadshotVIP).
- Adjust:
- Background (e.g., all-neutral gray for CVs)
- Outfit style (e.g., slightly more formal for job applications)
- Run a smaller second batch focused on your winning pose + outfit combo.
Advantages of using HeadshotVIP this way:
- ✅ Identity consistency: Advanced facial modeling to keep your eyes, jawline, and features true-to-life
- ✅ Business-focused styles: Presets tuned for LinkedIn, resumes, and corporate websites
- ✅ High-resolution outputs: Files optimized for 4K screens, CV printing, and team pages
- ✅ Team consistency: Style-consistent batch generation for companies that want uniform headshots
- ✅ Privacy-conscious processing: Modern, privacy-focused handling of your uploaded images
Method 2: Alternative tools (and where they struggle)
Existing top tools like Canva’s AI headshot app or Aragon AI can also produce quality results:
- Canva is great when you’re already designing resumes or social banners and want quick, free(ish) headshots with built-in editors.
- Aragon AI shines for volume (many variations) and photo realism, especially for individuals and teams.
Pros of these alternatives:
- Canva:
- Integrated photo editor (background remover, filters, etc.)
- Easy for social media creatives
- Aragon:
- Large variety of outputs
- Strong realism and attires
Cons compared with a focused tool like HeadshotVIP:
- Canva:
- Not primarily optimized for business-only looks
- May require extra manual editing to hit a consistent “brand” across multiple platforms
- Aragon:
- A lot of variety can mean more time sifting for one or two “perfect” shots
- Less tightly aligned to a single company or team’s visual style out of the box
If your main goal is “one or two absolutely reliable, professional headshots I can use everywhere”, a business-focused tool like HeadshotVIP keeps your workflow simpler and more targeted.
Tip 7: Export, crop, and test in real-world contexts
A great AI virtual headshot isn’t finished until you’ve tested it where it will actually live.
1. Export at the right resolution
- Use the highest resolution HeadshotVIP offers on your plan (Professional or Team tiers are ideal if you want 4K-level clarity).
- Save in JPG or PNG for:
- LinkedIn and other social networks
- CVs and PDF resumes
- Company profile pages
2. Crop for each platform
- LinkedIn:
- Square or near-square
- Head and shoulders, your face filling ~60–70% of the frame
- CV / resume:
- Smaller, often placed in a corner
- Keep background neutral or very subtle
3. Do a quick “trust check”
Before you finalize:
- Show 2–3 options to a colleague or friend:
- “Which one looks most like me?”
- “Which one feels most professional for [X role/industry]?”
- View it on:
- Desktop
- Mobile
- A printed PDF resume (if you use printed copies)
If something looks off (eyes too bright, skin too plastic, expression strange), go back to HeadshotVIP and:
- Re-run a small batch with “natural skin texture, realistic lighting”
- Pick a more neutral expression in your prompts and training photos
Quick comparison: general AI generators vs. a focused LinkedIn headshot tool
Here’s how different approaches usually stack up if your goal is a strong AI professional headshot for career use:
| Feature / Need | Generic AI image tools (e.g. art generators) | Canva AI headshot app | HeadshotVIP (recommended) |
|---|---|---|---|
| Trained specifically for human headshots | ❌ Often mixed subjects | ✅ Yes | ✅ Yes (business-focused) |
| Business-oriented styles (LinkedIn, resume, corporate) | ❌ Limited / random | ⚠️ Partially (depends on templates) | ✅ Multiple business packs (corporate/startup/etc.) |
| Identity consistency across many images | ❌ Frequently changes face | ⚠️ Varies | ✅ Advanced identity modeling |
| High-res output suitable for print & 4K | ⚠️ Not always | ⚠️ Good, but not optimized just for headshots | ✅ Optimized ratios & resolution for pro use |
| Team / company-wide consistency | ❌ Not designed for it | ❌ Manual work | ✅ Style-consistent team generation |
| Built-in privacy focus for portraits | ⚠️ Varies by provider | ⚠️ General design platform | ✅ Portrait-specific, privacy-focused handling |
FAQ: Getting the most out of AI-generated headshots
Q1: How many photos should I upload to get a realistic AI professional headshot?
A: Aim for 8–20 clear photos. Quality beats quantity. Include:
- Different angles (front, slight left/right)
- At least two outfits
- Consistent, good lighting
Avoid heavy filters, group shots, and very old photos. This gives tools like HeadshotVIP enough varied data to lock onto your real features while staying true to your current look.
Q2: Can AI headshots really replace a traditional photographer for LinkedIn and resumes?
A: For many professionals, yes—especially for standard business portraits. According to coverage from outlets like the Washington Post and Business Insider, recruiters increasingly accept well-done AI headshots as long as they look natural and honest. If you need highly customized brand campaigns, a photographer still has the edge. But for LinkedIn, CVs, and team pages, a well-configured AI headshot can be more than good enough.
Q3: What if my AI headshot looks too “airbrushed” or fake?
A: This usually happens because:
- Your input photos were heavily filtered
- The model applied strong beauty smoothing
- The style preset leaned toward glamour/cosplay
You can fix it by: - Uploading unfiltered training photos
- Choosing business or LinkedIn styles over “glamour”
- Adding prompt notes like “natural skin texture, visible pores, realistic lighting” and regenerating a smaller batch, especially in HeadshotVIP.
Summary
If your AI professional headshot still looks a bit uncanny, the problem is almost never just the tool—it’s the inputs, styling choices, and lack of iteration.
To recap the 7 pro tips:
- Use clean training photos that look like a mini photoshoot.
- Dress for your target role, keeping colors and patterns simple.
- Stick to three proven poses AI handles well.
- Write specific style prompts for lighting, background, and realism.
- Control lighting and backgrounds like a real photographer would.
- Iterate intelligently in HeadshotVIP, using your best outputs as guides.
- Export, crop, and test your headshot in real-world contexts.
HeadshotVIP is built exactly for this use case: fast, privacy-conscious, business-ready AI headshots for individuals and teams who care about looking credible online.
Try HeadshotVIP Now:
- Starter: $6.99 – ideal for individuals updating LinkedIn or a resume
- Professional: $9.99 – more styles and higher-resolution outputs for multi-platform branding
Related Articles
- Professional-Headshot-Tips
- best-ai-professional-headshot-generator-2025-guide
- ai-professional-headshot-branding-guide-2025
Current Date: 2026-02-07