Boost your AI professional headshot for LinkedIn (2025 tips)
Boost your AI professional headshot for LinkedIn (2025 tips)
You already have an AI professional headshot (or you’re about to generate one). But here’s the problem:
some AI photos look amazing in a gallery…and weird, fake, or awkward on a real LinkedIn profile.
Maybe the crop looks off on mobile, your expression feels “plasticky,” or the background screams “AI filter.”
That’s where people bounce instead of clicking “Connect” or “Message.”
This guide shows you how to optimize your AI headshot specifically for LinkedIn in 2025: style, framing, background, expression, file settings, and even A/B testing.
We’ll use HeadshotVIP as a concrete example, but all tips apply no matter which generator you used.
Follow these steps and you’ll turn your AI-generated photo into a LinkedIn-ready asset that gets more views, clicks, and interviews.
Why optimizing your AI professional headshot matters on LinkedIn
AI tools like Canva, Aragon, and HeadshotVIP have made studio-style headshots cheap and fast. Recruiters are increasingly okay with them—in fact, recent reports show many can’t even tell the difference when they’re done well.
But “done well” for LinkedIn is very specific. A good AI headshot for Instagram or a dating app can be a bad headshot for LinkedIn.
Here’s what actually matters on LinkedIn in 2025:
Recognition at a glance
Your face needs to be clear and consistent across comments, DMs, search results, and profile views.Professional fit for your role and industry
A startup founder, a lawyer, and a designer shouldn’t all use the same “generic corporate” AI look.Realistic, not uncanny
Over-smoothed skin, changed eye color, or AI artifacts instantly hurt trust.Optimized for LinkedIn’s UI
The same photo is shown:- tiny in comments
- circular in search
- larger on your profile page
If you don’t design for this, important details get cropped or lost.
The rest of this article breaks these down into clear steps you can implement in 30–60 minutes.
Step 1 – Pick the right AI style for LinkedIn (not Instagram)
Most AI tools let you pick between styles like “glamour,” “creative,” “casual,” or “corporate.”
For LinkedIn, the best style is professional but approachable, not overly dramatic.
1. Match the style to your role and industry
Use this as a quick rule-of-thumb:
| Role / Industry | Recommended AI style keywords |
|---|---|
| Corporate (finance, law, consulting) | “Corporate”, “Executive”, “Business formal”, “Neutral background” |
| Tech & startups | “Startup founder”, “Smart casual”, “Modern office background” |
| Marketing, design, creative | “Creative professional”, “Soft light”, “Warm tones” |
| Healthcare, education, non-profit | “Friendly professional”, “Natural light”, “Soft background” |
| Freelancers / solopreneurs | “Personal brand”, “Clean background”, “Smart casual” |
On HeadshotVIP, for example, you can select:
- LinkedIn / Corporate: suits, blazers, clean backgrounds
- Startup / Founder: slightly more relaxed outfits and modern office looks
- Creative / Personal brand: softer tones and more personality
Action:
If your AI tool gave you 30–100 images, shortlist 5–10 that:
- Look the most like you (face shape, eye color, hairline)
- Match your target industry vibe
- Have simple, non-distracting backgrounds
We’ll optimize those next.
Step 2 – Crop and frame for LinkedIn’s circular preview
LinkedIn displays your headshot in:
- A circle on profile pages and search results
- A tiny circle in comments and DMs
- A square or larger preview when someone opens your profile
If you upload a wide horizontal photo, LinkedIn will auto-crop it—often cutting off shoulders or the top of your head.
Recommended crop for an AI professional headshot
- Aspect ratio: 1:1 (square) works best
- Framing:
- Top: a little space above your head
- Bottom: mid-chest or upper chest
- Face: should occupy 60–70% of the height in the square
Think: passport-style framing, but friendlier and brighter.
How to do it with HeadshotVIP (or any editor):
- Open your favorite AI headshot in an editor (HeadshotVIP’s built-in tools, Canva, or your OS editor).
- Set crop to 1:1 (square).
- Position your face slightly above center (so the circular crop won’t cut your chin).
- Check how it looks if you draw an imaginary circle around the center—your eyes should be above the midline.
- Export at high resolution (at least 800×800 px, 1200×1200 is even better for crispness).
Tip:
Before uploading, shrink the image to 40×40 px in any image viewer. If your face is still recognizable and looks natural, you’re in a good spot.
Step 3 – Clean, realistic backgrounds that don’t scream “AI”
Many headshot generators (including Aragon and Canva) offer flashy or artistic backgrounds. Those are fine for social media, but on LinkedIn they often look out of place.
What works best for LinkedIn in 2025
Aim for backgrounds that are:
- Simple: solid colors, soft gradients, or very lightly blurred office scenes
- Subtle: no text, logos, or hard patterns
- Well-separated: clear contrast between your face and the background
Good options:
- Light gray
- Soft beige
- Light blue
- Slightly blurred modern office
Risky options:
- Extremely colorful gradients
- Very busy cityscapes
- Strong bokeh with obvious AI artifacts
- Anything where your hair “melts” into the background
Optimizing background with HeadshotVIP
HeadshotVIP is already tuned for business-focused backgrounds, but you can still improve:
- Generate multiple styles (LinkedIn / Corporate / Startup).
- Shortlist images where:
- There’s no halo or weird glow around your head.
- Edges around hair and ears look clean.
- The background doesn’t distract from your eyes.
- If needed, you can do a final tweak in another editor:
- Slightly blur a busy background.
- Use a vignette to darken corners and pull attention to your face.
- Adjust brightness/contrast so you don’t “blend in.”
Optional advanced move:
If your tool supports it (e.g., Aragon’s Background Changer or Canva’s BG remover), try placing yourself in a realistic, softly blurred office scene. Avoid obviously fake skylines.
Step 4 – Fix facial expression, eyes, and realism
This is where most AI professional headshots fail: they’re technically high-quality but look off.
1. Expression: the “professional approachable” rule
For LinkedIn, your expression should be:
- Relaxed face
- Gentle smile (mouth closed or slightly open)
- Eyes looking at the camera
Avoid:
- Overly dramatic model poses
- Intense squints or exaggerated jawlines
- Full-on laughter shots for your main profile (you can save those for banner/personal site)
Checklist when reviewing AI results:
- Do your eyes look focused and alive (not glassy)?
- Does the smile match how you naturally smile?
- Are both sides of your face symmetrical enough (no twisted mouth or uneven teeth)?
If the expression looks better than you do on your best day, that’s fine—as long as it still looks like you.
2. Watch for “AI tells” and artifacts
AI models sometimes:
- Change your eye color
- Over-smooth your skin into plastic
- Slightly change nose shape or jawline
- Add extra earrings / hair strands / small glitches
Reject any image where:
- You look like a different person
- The skin texture is so smoothed that pores disappear entirely
- Edges (hairline, ears, glasses) look melted or fuzzy
Tip:
Compare each candidate headshot side-by-side with a real selfie.
If a friend would say “that doesn’t really look like you,” don’t use it as your main LinkedIn photo.
Step 5 – Get the technical details right for LinkedIn
Even the best AI professional headshot can look bad if the file is wrong.
LinkedIn-friendly export settings
- File type: JPG (safe default) or PNG
- Size: At least 800×800 px (1200×1200 px is better)
- File size: Aim for < 2 MB for snappy loading
- Color & tone:
- Slightly boost brightness and contrast so you stand out
- Keep skin tones natural—avoid heavy filters
Most AI tools, including HeadshotVIP, export in high resolution. If the file is huge (5–10 MB), you can compress it using a tool like TinyJPG before uploading.
On HeadshotVIP specifically:
- Use the Professional / LinkedIn output option to get:
- Correct aspect ratios
- Adequate resolution for LinkedIn, resumes, and company websites
- Then, apply the 1:1 crop from Step 2 if needed.
Step 6 – A/B test your AI headshot on LinkedIn (in 20 minutes)
Most users stop at “upload once and forget.” You can do better.
Simple ways to test which AI headshot performs better
You don’t get official “headshot A/B tests” on LinkedIn, but you can still test impact:
Method A – Profile view trend
- Choose 2–3 final candidates.
- Use one as your profile photo for 7 days.
- Note:
- Profile views
- Connection requests
- InMail or message replies
- Switch to the next photo for another 7 days.
- Compare the numbers.
This isn’t perfect science—content activity also affects views—but big differences are usually visible.
Method B – Ask your target audience
- Create a private post or group chat with:
- Colleagues
- Friends in your industry
- A mentor or recruiter connection
- Share 3 small versions of your AI headshots (labeled A, B, C) without saying which is AI.
- Ask:
- “Which one looks most like me in real life?”
- “Which one would you trust most for a LinkedIn profile?”
- “Which one feels best for [role/industry]?”
You’ll quickly see a winner.
HeadshotVIP makes this easier by giving you multiple consistent looks from the same base model, so you can test variation in expression, zoom, and background while keeping your identity stable.
Method 1: Using HeadshotVIP to create a LinkedIn‑ready AI professional headshot (recommended)
Use case:
You want a business-focused AI headshot that’s tuned for LinkedIn, resumes, and company websites, without spending hundreds on a photographer. You care about realism and consistency more than gimmicky filters.
Step-by-step: from selfie to optimized LinkedIn headshot
Go to HeadshotVIP
Visit HeadshotVIP’s website in your browser.Create your account and pick a plan
- Choose Starter if you just need a set of personal headshots.
- Choose Professional if you want more styles and higher-res outputs for multi-platform use.
- Teams can request a custom Business / Team plan for consistent company-wide headshots.
Upload your source photos
For best results, upload:- 8–15 clear selfies or portraits
- Different angles (front, slight left/right, a couple profiles)
- Good lighting, no heavy filters, no sunglasses or large hats
Results depend heavily on input quality, so it’s worth spending 5–10 minutes here.
Choose a LinkedIn‑friendly style pack
In the style options, prioritize:- LinkedIn / Corporate / Executive / Startup packs
- Neutral or office backgrounds
- Smart casual to formal outfits appropriate for your role
Generate your AI headshots
- Click Generate and let HeadshotVIP build a model based on your face.
- In a short time, you’ll get a batch of high‑resolution AI professional headshots.
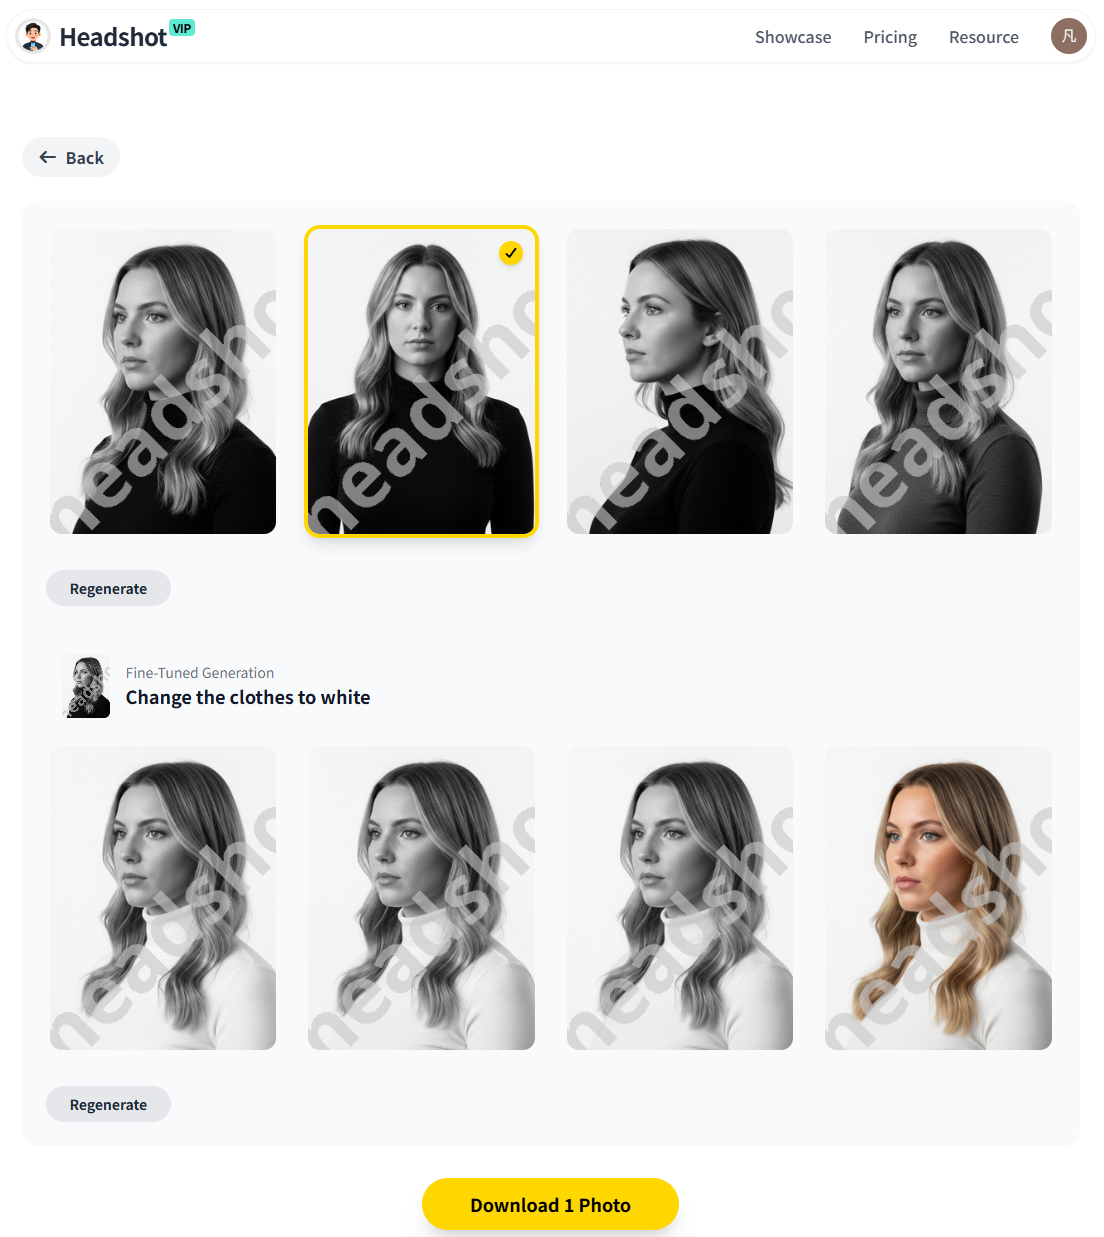
Shortlist the best images
Inside HeadshotVIP’s gallery:- Star the photos that:
- Look most like you
- Have clean backgrounds
- Show a natural, relaxed expression
- Aim to keep 5–10 top candidates.
- Star the photos that:
Optimize crop and background (inside or outside HeadshotVIP)
- Crop to 1:1 square, framing head and upper chest.
- Ensure there’s room for LinkedIn’s circular crop.
- If your plan includes style tweaks, pick the most neutral background for LinkedIn.
Export at LinkedIn‑ready resolution
- Download your final picks at 800–1200 px on the shorter side.
- Save as JPG to keep file size reasonable.
Upload to LinkedIn
- Go to your profile → click your photo → Update photo.
- Use LinkedIn’s built-in crop tool to make a centered circle.
- Avoid LinkedIn’s heavy filters; slight brightness is okay, but don’t overdo it.
HeadshotVIP advantages for LinkedIn users
- ✅ Business-focused styles: LinkedIn, corporate, startup, and executive looks built-in
- ✅ High-resolution outputs tuned for LinkedIn, CVs, and About pages
- ✅ Identity consistency: advanced facial modeling keeps you looking like you across dozens of shots
- ✅ Team-ready: consistent style across an entire company, ideal for About/Team pages and LinkedIn org profiles
- ✅ Privacy-focused processing: designed with professional use and data handling in mind
Honest limitations:
- Results are still limited by input photo quality (bad lighting or blurry selfies will show).
- Compared with a human photographer, you have less control over micro-poses (exact tilt, hand placement, etc.), so you may need to generate a few rounds to find favorites.
Method 2: Using general-purpose tools (Canva, Aragon, others)
You can also optimize an AI professional headshot for LinkedIn using more general tools like Canva or Aragon.
Example workflow with Canva (non-specialized)
- Upload a selfie to Canva’s AI headshot generator.
- Choose a business-appropriate style and background.
- Generate multiple options, then pick the most realistic ones.
- Use Canva’s crop tool to make a square image.
- Optionally, use:
- Background remover to simplify a busy background
- Brightness/contrast tools for minor corrections
- Export and upload to LinkedIn.
Pros of this approach
- ✅ Often free or low-cost for a small number of images
- ✅ Easy to apply extra design elements for other platforms
- ✅ Great if you already use Canva for resumes, slides, or posts
Cons (where HeadshotVIP is stronger)
- ❌ Styles are not always optimized for business headshots, so you may get overly “social” looks
- ❌ More manual work to ensure identity consistency and realism
- ❌ Backgrounds and lighting might require extra editing to look truly professional
If you’re primarily focused on LinkedIn and business profiles, a specialized tool like HeadshotVIP usually gets you to a better result faster, with fewer “this doesn’t really look like me” rejects.
7 quick expert tips to make your AI headshot work harder on LinkedIn
1. Match your banner and headshot
Use your LinkedIn banner to extend your personal brand:
- If your headshot background is light and neutral, pick a banner with complementary colors.
- Avoid strong clashing colors that fight for attention with your face.
- You can create a simple branded banner in Canva or similar tools, then reuse your HeadshotVIP headshot in a corner.
2. Keep your headshot consistent across platforms
Use the same (or very similar) AI professional headshot for:
- Your personal website / portfolio
- Speaker bios and event pages
- Email signatures
This builds recognition. HeadshotVIP’s consistent style output is especially helpful here.
3. Align your outfit with your headline
If your headline says “Senior Corporate Counsel,” a hoodie in your headshot sends mixed signals.
If it says “Founder, Early-Stage Startup,” a hyper-formal tux may feel off.
Make sure your outfit in the AI photo matches your current or target role.
4. Avoid heavy beauty filters
Slight blemish reduction is fine. But:
- Over-smoothing can make you look younger or different in a way that surprises people on video calls.
- Recruiters will see the real you eventually—your photo should be the best honest version of you, not a different person.
5. Update your headshot after major changes
If you change:
- Hair length or color dramatically
- Facial hair (beard to clean-shaven, etc.)
- Glasses vs. no glasses
It’s worth regenerating a new AI professional headshot so people recognize you in meetings.
6. Think about accessibility
High contrast between your face and the background helps:
- Users on small screens
- People with mild visual impairments
- Anyone viewing in bright environments (sunlight, etc.)
Avoid super low-contrast looks (e.g., dark hair on a very dark background).
7. Combine your headshot refresh with a profile update
When you update your photo, also update:
- Headline: Include what you do and who you help.
- About section: Short, clear summary of your value.
- Featured section: Add a portfolio, article, or case study.
A new AI professional headshot can draw attention; a strong profile keeps people there.
FAQ: AI professional headshots and LinkedIn in 2025
Q1: Will recruiters reject me if my LinkedIn headshot is AI‑generated?
A: Most recruiters care more about clarity, professionalism, and honesty than whether a headshot is AI or camera-based. Public coverage from outlets like the Washington Post and Business Insider shows AI headshots are becoming normal—some tools even produce photos recruiters prefer. As long as the image looks realistic and like you, it’s usually fine.
Q2: Do I need to disclose that my headshot is AI‑generated?
A: On LinkedIn, there’s no requirement to label your headshot as AI. However, your photo should be an accurate representation of you. If asked in an interview, you can be transparent: “I used an AI headshot tool to generate a professional-quality photo based on my real selfies.”
Q3: Can I use my LinkedIn AI headshot on resumes and company websites?
A: Yes, as long as you have rights to the images from your chosen tool (check its terms). HeadshotVIP, for example, is designed for LinkedIn, CVs, team pages, and bios, with resolutions suitable for digital and print. Just make sure the styling fits the context (more formal for corporate websites, slightly more relaxed is okay for personal portfolios).
Summary
An AI professional headshot can absolutely work on LinkedIn in 2025—but only if you optimize it for how LinkedIn actually displays and uses your image.
To recap:
- Choose the right business-focused style for your role and industry.
- Crop and frame for LinkedIn’s circular previews and tiny comment icons.
- Use simple, realistic backgrounds that don’t distract or expose AI artifacts.
- Prioritize a natural, approachable expression that still looks like you.
- Export with LinkedIn-friendly technical settings (square, 800–1200 px, JPG).
- A/B test with small audiences or over a few weeks to see what performs best.
Tools like HeadshotVIP make this easier by focusing purely on professional, LinkedIn-ready AI headshots, with strong identity consistency and business-appropriate styles.
Try HeadshotVIP Now:
- Starter: $6.99 – great for individuals updating LinkedIn and resumes
- Professional: $9.99 – more styles & higher-res outputs for multi-platform branding
Related Articles
- Professional-Headshot-Tips
- ai-professional-headshot-branding-guide-2025
- best-ai-professional-headshot-generator-for-linkedin-2025
Current Date: 2026-01-23