Create AI professional headshots for Instagram in 2025
Create AI professional headshots for Instagram in 2025
If your Instagram profile photo looks blurry, too dark, or just “not you,” you’re not alone. Many professionals and creators still use old selfies or badly cropped group photos. On a platform where people make follow decisions in seconds, that tiny circle matters a lot.
Here’s how to fix it.
This guide walks you through Instagram headshot optimization in 2025 using AI professional headshots. You’ll learn how to plan the right look for your brand, generate clean 4K-style portraits with HeadshotVIP, crop and size them correctly for Instagram, and keep everything consistent across your content.

Why your Instagram headshot looks bad (and how to avoid it)
Before touching AI tools, it helps to understand why so many profile pictures fail on Instagram. Most issues fall into three buckets: technical quality, composition, and brand mismatch.
1. Technical issues: blur, compression, and wrong size
Instagram compresses every image you upload. If your file is already low-quality, Instagram’s extra compression makes it worse.
Common problems:
- Uploading screenshots instead of original photos
- Using images that are too small (e.g., 400×400 px)
- Heavy filters that destroy skin detail and sharpness
What to aim for in 2025:
- Use a minimum of 1000×1000 pixels for your Instagram profile headshot
- Export as JPEG, high quality (80–90%)
- Keep file size reasonably small (usually under 1 MB) but not aggressively compressed
For comparison, many professional photographers (like the one in the first reference article) recommend ~1000 px on the long edge for social avatars, which still applies perfectly to Instagram today.
2. Composition issues: wrong crop, busy background, awkward pose
Instagram shows your headshot as a circle, but you upload it as a square. Anything close to the corners gets cut off. That’s why text, logos, or half your hairline might be missing.
Common issues:
- Face too small in the frame
- Head cut off at the top
- Distracting objects or people behind you
- Harsh shadows, weird color casts, or mixed lighting
Simple composition checklist for Instagram:
- Square ratio (1:1) before uploading
- Your eyes on the upper third of the frame
- Head and shoulders visible, with some breathing room above your head
- Clean, non-distracting background (solid color, blur, or simple texture)
3. Brand mismatch: the photo doesn’t match your content
On Instagram, your profile photo is part of your brand story. A serious corporate-style headshot on a colorful creator profile can feel off. A playful selfie might hurt trust if you sell high-ticket consulting.
Ask yourself:
- Do I want to look more approachable, authoritative, or creative?
- Does this headshot match my feed aesthetic (colors, vibe, energy)?
- Would a stranger understand roughly what I do by glancing at my photo and bio?
This is where AI-generated headshots shine. You can create multiple looks that stay true to your identity, then choose the version that fits Instagram best.
How to create an AI professional headshot for Instagram (step-by-step)
Method 1: Using HeadshotVIP (Recommended)
Use Case:
Professionals, creators, and freelancers who want a studio-quality Instagram profile picture without booking a shoot. Ideal if you:
- Don’t have recent professional photos
- Struggle with good lighting or backgrounds
- Want consistent looks across Instagram, LinkedIn, and your website
- Need fast results but still care about realism and professionalism
Step-by-step: Generate your Instagram-ready headshot with HeadshotVIP
Go to HeadshotVIP and create your account
Open HeadshotVIP in your browser. Create a free account with your email or sign in if you already have one.Collect 10–20 good selfies
The AI is only as good as what you feed it. Use photos that:- Show your face clearly (no sunglasses or heavy masks)
- Are taken from different angles (front, 3/4, slight side)
- Have decent lighting (window light is great)
- Reflect how you actually look right now (hair color, facial hair, glasses)
Avoid:
- Group photos where your face is tiny
- Over-filtered images
- Blurry or pixelated screenshots
Upload your photos to HeadshotVIP
Inside HeadshotVIP, start a new project and upload your selected selfies. Follow the on-screen tips about:
- Face visibility
- Avoiding extreme poses
- Using a mix of backgrounds and outfits
The system uses AI facial recognition and identity modeling to keep you looking like… you.
Choose Instagram-appropriate styles
HeadshotVIP offers several business-focused styles (corporate, LinkedIn, startup, executive, creative). For Instagram, you usually want:
- Startup / Creative styles for creators, designers, indie founders
- Corporate / Executive styles for consultants, lawyers, finance, B2B experts
- Neutral LinkedIn-style for a clean, versatile professional look
Tips for Instagram:
- Aim for softer backgrounds (light grey, beige, blurred office, minimal texture)
- Avoid extremely dark or overly busy backgrounds that shrink your face visually
- Choose outfits that match your brand palette or feed colors if possible
Generate your AI headshots
Click Generate and let HeadshotVIP create a batch of AI professional headshots. Depending on your plan, you’ll get multiple variations:
- Different angles and expressions
- Slightly varied backgrounds and lighting
- Multiple outfit options within your chosen style
This gives you options: one might be perfect for Instagram, another for LinkedIn, another for your website.
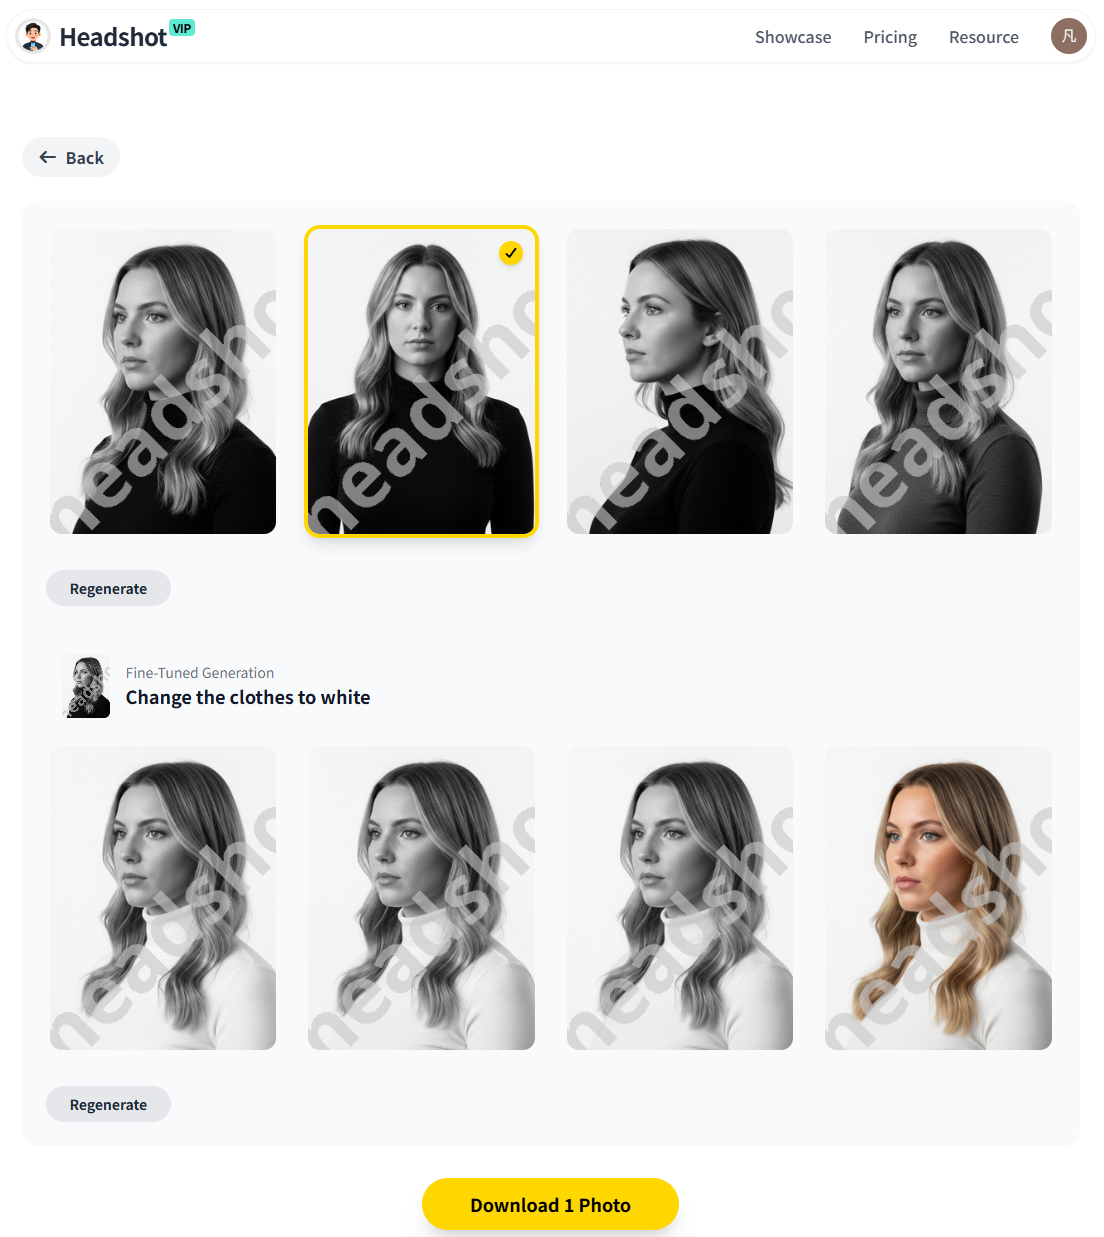
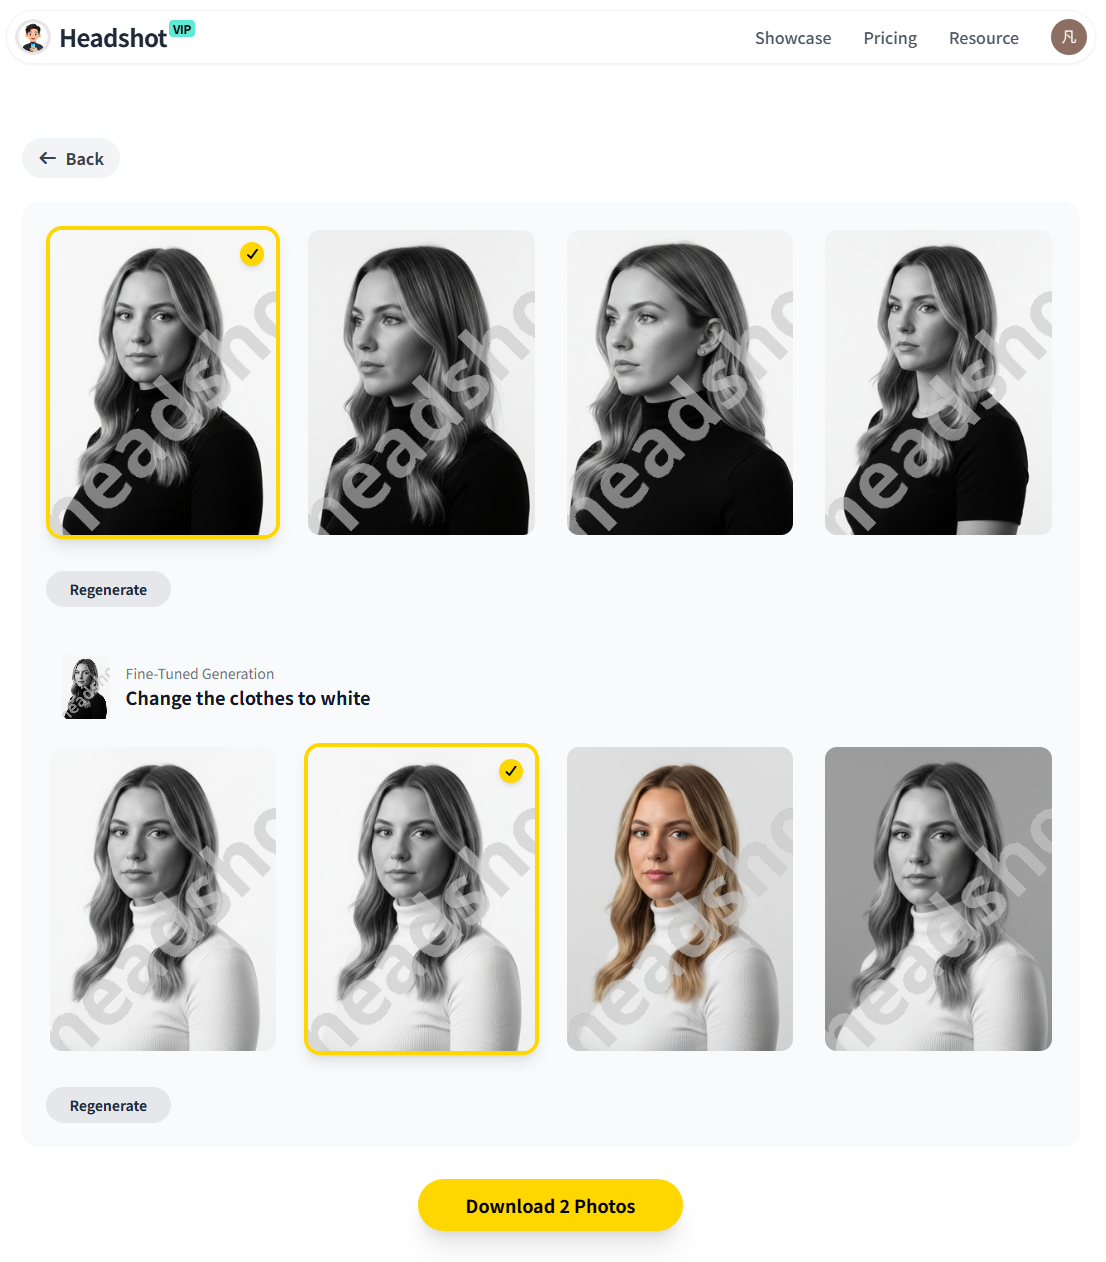
Pick the best Instagram candidate
When reviewing your results, look for:
- Clear eye contact with the viewer
- Natural expression (subtle smile or relaxed neutral)
- Clean, simple background with good separation from your hair and outfit
- No weird artifacts around ears, hairline, or glasses
Remember: Instagram profile images are tiny on mobile, so face clarity beats subtle details.
Crop and size for Instagram
Download your chosen headshot in high resolution (HeadshotVIP supports 4K-level realism and large outputs). Then:
- Open it in any editor (your phone’s Photos app, Canva, or a basic image editor)
- Crop to 1:1 square with your eyes on the upper third
- Make sure your shoulders and entire head fit comfortably inside the square
- Save at ~1000×1000 px (or larger, like 1500×1500 px – Instagram will downscale)
If you want to be extra precise, you can run it through a free image compressor (similar to how TinyJPG is used for websites) to keep quality high with a smaller file size. Don’t overdo compression though—Instagram will compress again.
Upload as your Instagram profile picture
On Instagram:
- Go to your profile → Edit profile
- Tap your profile photo → New profile picture
- Select the square headshot
- Use Instagram’s crop preview to be sure your face isn’t cut off in the circular frame
Check how it looks:
- On your own phone
- On a friend’s phone
- In both light and dark mode
Advantages of using HeadshotVIP for Instagram headshots
✅ Professional quality without a studio
You get business-grade portraits that look like they came from a real shoot—no need for lighting gear or backdrops.✅ Multiple styles for different platforms
Create a slightly more relaxed version for Instagram and a stricter corporate version for LinkedIn from the same upload.✅ High-resolution, 4K-level realism
Sharp enough for large displays, but easy to resize for Instagram avatars and posts.✅ Consistent look across your brand
Perfect if you’re a team or agency: everyone can have matching backgrounds and styles, which looks polished on Instagram Highlights and team posts.✅ Fast turnaround and predictable cost
No scheduling photographers or reshoots. Pricing is simple:- Starter: low-cost entry (great for solo users)
- Professional: more styles and higher-resolution outputs
- Team / Business: custom pricing for whole teams
Important limitation to know:
Results still depend on your uploaded photos. If you only provide dark, blurry, or heavily filtered selfies, the AI has less to work with. You also don’t get the same manual posing and micro-retouching control a human photographer provides—but you gain speed, affordability, and flexibility.
Method 2: Traditional photos + manual editing
You can absolutely create a good Instagram headshot without AI. The classic approach is:
- Ask a friend (or use a tripod)
- Shoot near a bright window or outdoors in shade
- Use portrait mode on a recent smartphone
- Edit in tools like Lightroom Mobile, VSCO, or Snapseed
- Crop to square, export, and upload
Pros:
- More control in the moment (you can adjust pose, posture, and expression live)
- No need to upload personal photos into an AI system if you’re privacy-sensitive
- Good modern phones can produce very solid results
Cons (where HeadshotVIP is stronger):
- Quality depends heavily on your friend’s skill with lighting and composition
- You might have distracting backgrounds you can’t easily remove
- Time-consuming if you need different looks (creative vs corporate)
- Harder to get consistent style across multiple people or platforms
- Editing can easily go too far—leading to the same blurry, overfiltered look Instagram compresses even more
For many people, the sweet spot is using HeadshotVIP to get a solid, clean base, then doing light adjustments (exposure, contrast, crop) in your favorite mobile editor before uploading.
Instagram headshot optimization tips for 2025
This section focuses on practical tweaks to get the most from your AI-generated headshot once you have it.
1. Nail the crop for Instagram’s circular frame
Even if you export a perfect square, Instagram will show it as a circle.
Checklist before you upload:
- Your eyes are above the centerline of the square
- No key features (hair, shoulders) are cut off by the circular crop
- There’s enough space above your head so the circle doesn’t feel cramped
- No text or logos near the edges—Instagram will crop them away
Tip: Temporarily set it as your profile pic, then check how it looks in:
- Your feed (under posts and in comments)
- Story viewers (tiny avatar at the top)
- DM list (smallest version)
If your face is still recognizable and clear at those tiniest sizes, you nailed the crop.
2. Match your headshot style to your Instagram niche
Use your secondary AI-generated headshots (from HeadshotVIP) for testing. You might find that what looks “perfect” for LinkedIn doesn’t convert as well on Instagram.
Some guidelines:
Coaches / consultants / service providers
- Clean, bright background
- Confident but approachable smile
- Clothing: solid colors, avoid heavy patterns
- Slight 3/4 angle often feels more friendly than strict front-facing
Creators / designers / artists
- Slightly more playful or colorful background
- Casual but tidy clothing that reflects your style
- Expression can show more personality—half-smile, a bit of energy
Founders / startup teams
- Modern office or neutral background
- Smart-casual outfits
- Consistent style and background across co-founders
If you’re unsure, use the most neutral professional variation as your base. You can always test more creative options later.
3. Keep colors consistent with your feed
This is where Instagram differs from LinkedIn: aesthetic matters.
When choosing (or slightly recoloring) your AI-generated headshot, think about your:
- Brand colors (and what shows up across your top 9 posts)
- Skin tone and how it interacts with background colors
- Clothing color and contrast
Easy way to check:
- Open your Instagram profile
- Imagine your new headshot in the top-left circle
- Ask: does the color temperature feel aligned or does it clash badly?
If your feed is warm and creamy, a cold blue background might feel off. With HeadshotVIP, you can simply choose a style with a warmer background or tweak warmth in a simple editor.
4. Respect Instagram’s technical limits
Instagram’s exact compression algorithms change over time, but some principles are stable:
- Use JPEG (not WebP or TIFF)—Instagram converts everything anyway
- Stick to sRGB color space (most tools do this by default)
- Avoid uploading images that are tiny or already heavily compressed
For regular posts, Instagram generally favors resolutions up to 1080px on the shortest side, and the community on places like r/MarketingGeek often recommends similar sizes. For profile pictures, your high-res AI headshot will be downscaled, so starting from ~1000–1500 px square gives you a safe buffer.
5. Keep your headshot in sync across platforms
One underused branding trick:
Use the same core headshot (or clearly related variations from the same AI batch) across:
- X (Twitter)
- Your website About page
- Email signature
Benefits:
- People recognize you faster across platforms
- You build visual trust—they know they’re in the right place
- It feels like a real, cohesive brand instead of random pictures everywhere
HeadshotVIP is designed exactly for this: generate once, then adapt and crop for each platform.
Quick comparison: AI vs traditional Instagram headshots
| Feature | DIY Phone + Edit | Traditional Photographer | HeadshotVIP (AI) |
|---|---|---|---|
| Cost | Low / free | Highest | Low–medium (per project) |
| Time to get results | Same day | Days–weeks (booking + editing) | Usually same day after upload |
| Control over live posing | Medium | Highest | Limited (poses from AI, not live) |
| Background control | Limited (location-based) | Strong but depends on location | High (AI-created clean backgrounds) |
| Consistency across platforms | Manual effort | Requires package shoot | High (multiple looks from same upload) |
| Consistency across team | Hard | Requires team shoot | Very high (style-consistent batch) |
| Technical image quality | Good with newer phones | Very high with pro gear | Very high with 4K-level outputs |
| Dependence on input photos | High | Photographer can compensate | High (quality selfies still required) |
You don’t have to choose only one forever. Many users start with AI headshots to quickly raise their profile quality, then add a professional shoot when timing and budget allow.
Summary
To stand out on Instagram in 2025, your profile photo can’t be an afterthought. Instagram headshot optimization comes down to three things:
- A strong, realistic source image – AI tools like HeadshotVIP turn everyday selfies into studio-style portraits with clean backgrounds, flattering lighting, and business-ready styling.
- Instagram-specific formatting – crop to a square, keep your eyes in the upper third, and use a resolution around 1000–1500 px so Instagram’s compression doesn’t wreck your image.
- Brand alignment – pick a style (corporate, startup, creative) that matches your niche, colors, and the overall vibe of your feed.
HeadshotVIP makes it easy to generate multiple professional looks from a single upload, so you can pick the perfect version for Instagram and keep the rest for LinkedIn, your website, or your portfolio.
Try HeadshotVIP Now:
- Starter: $6.99 – ideal for individuals who need a set of professional AI headshots
- Professional: $9.99 – more styles, higher-resolution outputs, and added flexibility
Related Articles
- Professional-Headshot-Tips
- ai-professional-headshot-branding-guide-2025
- create-ai-professional-headshot-for-personal-brand-2025
Current Date: 2026-01-13